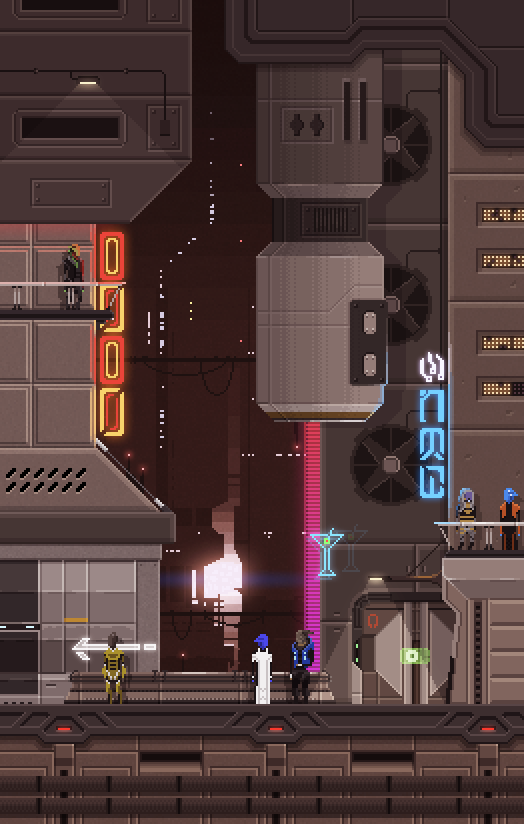
This image was created by Deviant Art user pieceoftoast. This is an art piece, not a screenshot from a game. I liked how this image evoked older games like those made by Sierra On-Line and Lucas Arts, but it also had an updated, modern feel. Sometimes this pixel art style is referred to as hi-bit. Hi-bit games have a retro, pixel art aesthetic but aren't constrained to the limitations of retro hardware. This is in contrast to games like Shovel Knight which try to adhere to the capabilities of a specific platform.
I thought it would be a fun hobby project to write a pixel art renderer that could replicate this image in-engine. By in-engine I mean that things like lighting and glow would be implemented by the rendering system instead of being baked into the art.
Note: The renderer was built using C++ and OpenGL, but the techniques I discuss here should apply to any API or engine you are using.
My first step was to identify all the rendering features from the image that I'd need to implement.
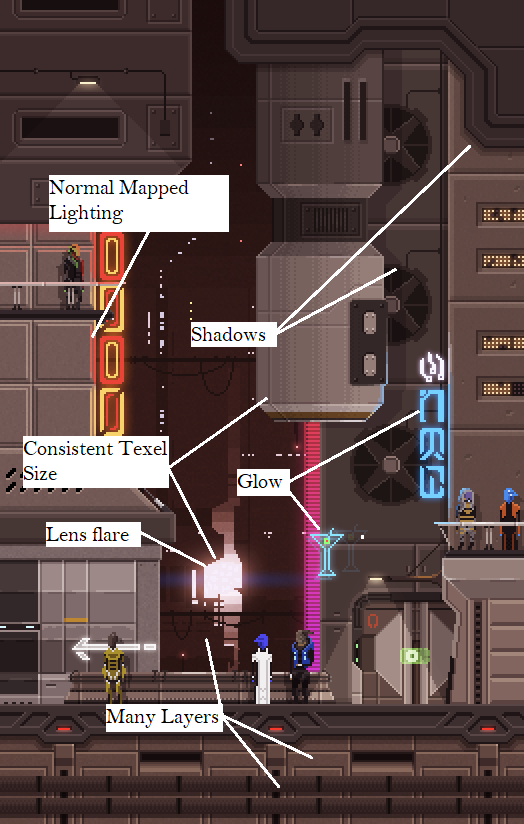
Here's what I came up with:
I also knew that I wanted my renderer to implement pixel-perfect texture sampling. This means that screen pixels that overlap multiple texels (from the same tile or adjacent tiles) should perfectly blend the percentage contribution from each texel.
I'll discuss the implementation of each of these features in future articles. For the remainder of this article, I'll explain how I supported layers in the renderer.
My initial approach was to copy how 2D games did it before the advent of 3D rendering: Represent the scene as a series of 2D layers and assign each layer a parallax scalar.
In my renderer each layer was composed of tiles. Tiles are just screen-facing quads with a texture applied to them. At render time, I drew the layers back-to-front using an orthographic view-projection matrix. When calculating the view matrix for a layer, I scaled the translation by the parallax amount. So for a layer with a parallax scalar equal to 1, the layer would track the camera exactly. For a layer with a parallax scalar set to .5, the tiles in that layer would move at half the speed.
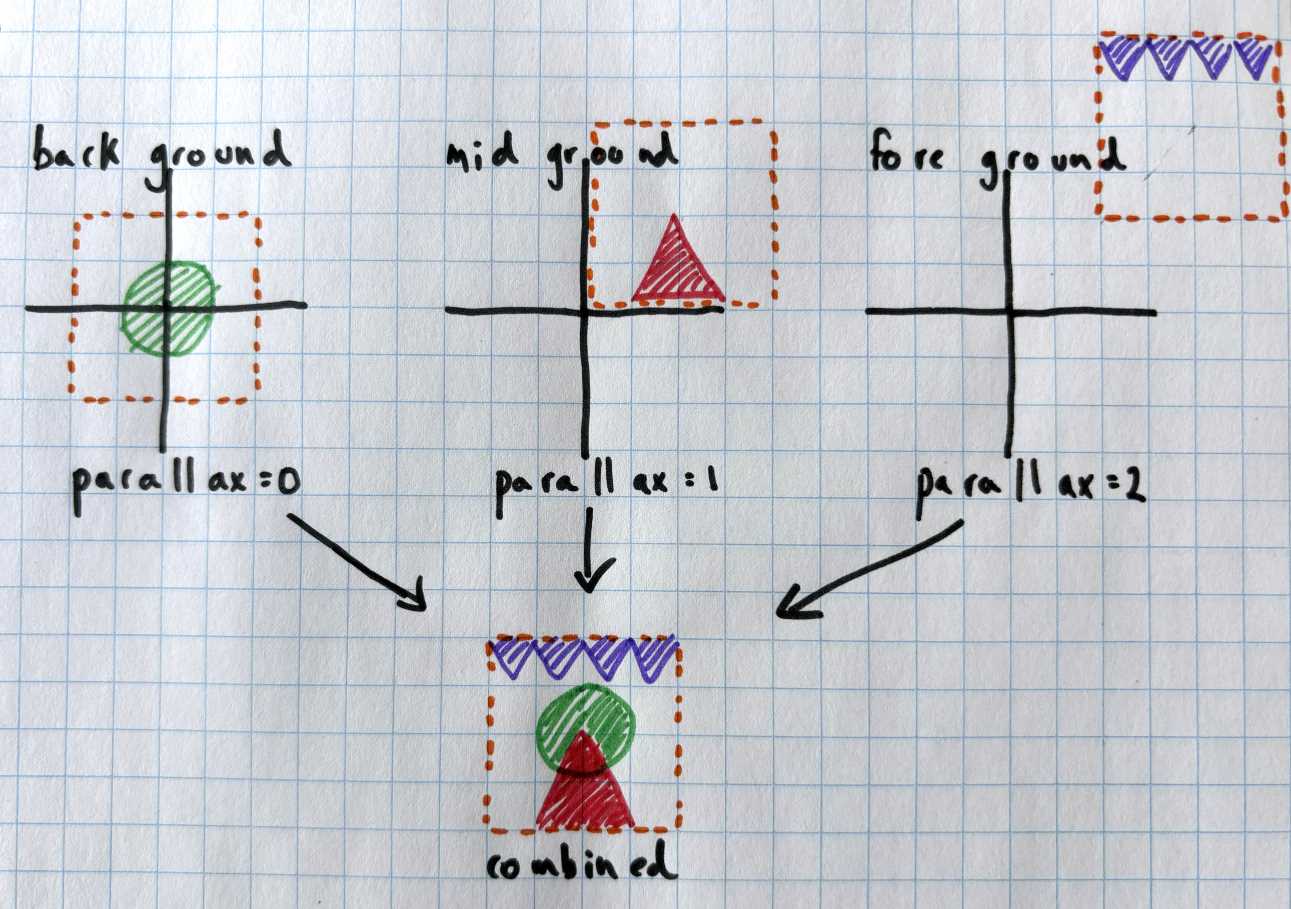
This approach quickly proved cumbersome. Scene management, such as selecting and moving tiles, was complicated by the presence of layers. Moving a tile farther back in the scene required moving the tile to another layer. If that layer didn't have the parallax amount I wanted, I'd have to create another layer. For a game with just a few layers, this approach could be manageable. But if I wanted more than a few then I needed a different approach.
For my next approach, I extended the renderer to 3D. I removed the concept of layers and instead gave each tile a z coordinate. The scene was rendered using a perspective projection matrix which gave the desired parallax effect when the camera moved in the xy plane. But by using a perspective projection, tiles farther in the background were drawn smaller on the screen. This broke the goal of having a consistent texel size. To fix this, I calculated an xy scale for each tile depending on its distance from the camera. The farther a tile was from the camera, the more it would need to be scaled up to offset the size reduction caused by perspective.
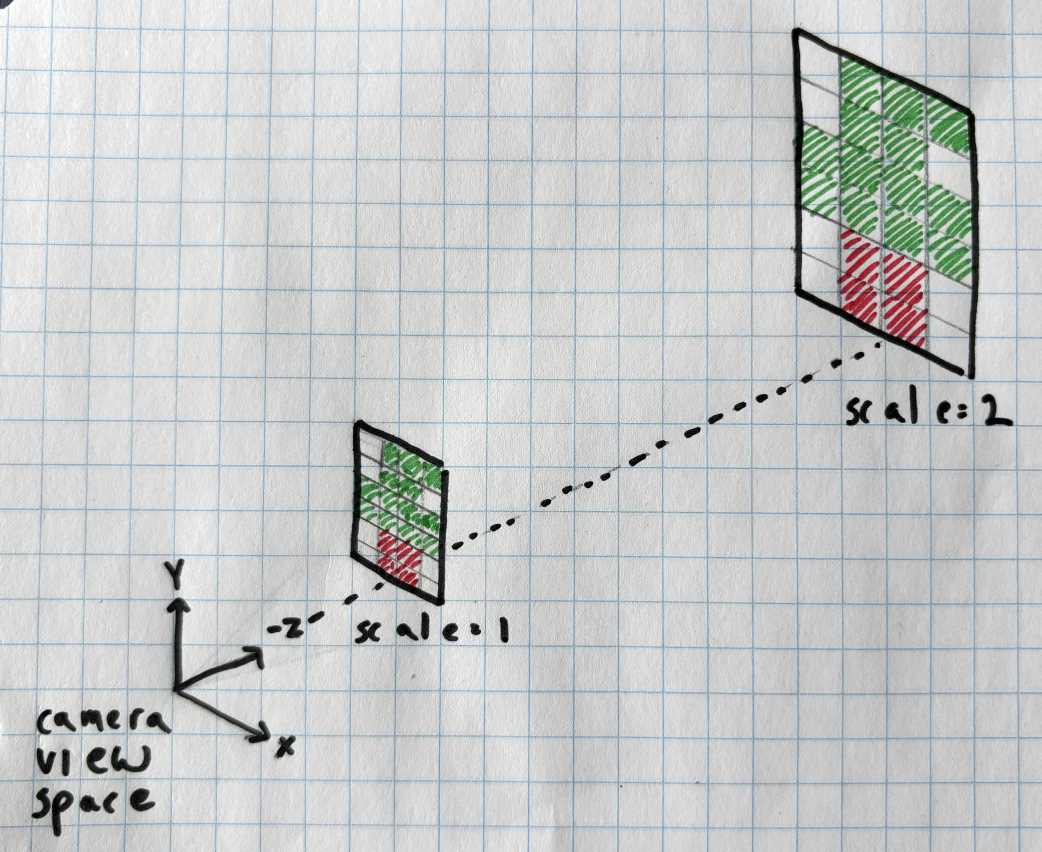
I picked z==0 as the location at which the tile's scale would equal 1. Here is how I calculated the camera distance:
//Code that runs at renderer startup
//Set camera distance so that the height of xy plane at z==0 is gScreenHeightInTexels.
gCameraDist = (gScreenHeightInTexels)/(2.f*tanf(DegToRad(.5f*gRenderVerticalFOVDegrees)));

//Returns how much to scale a tile so that texels are a consistent on-screen size.
float GetTexelScaleAtZ( float z )
{
    float scale = (gCameraDist-z)/gCameraDist;
    return scale;
}
I kept gCameraDist constant, the camera could move in x and y but was fixed in z. Moving in z would cause closer tiles to scale up/down faster than tiles farther away. This would break the consistent texel size goal. When placing a new tile or changing a tile's z coordinate, I'd calculate the new tile scale by calling the function GetTexelScaleAtZ.
This technique worked well and I was mostly satisfied with it. There was a bit of code complexity in managing the tile scale (moving multiple tiles at different z-depths was a tricky problem to get right). However, I proceeded with development using this approach for quite a while. It wasn't until I began implementing shadows that I started to rethink it. The problem was that if we did a parallel projection of a shadow onto a tile farther in the distance, the shadow texels were smaller than the texels of the tile they were projected onto. I could have used nearest sampling to make them the correct size, but then we'd be downsampling our pixel art shadow. I wanted to avoid downsampled shadows because downsampling ruins the look of pixel art (for example: single-texel lines will disappear).
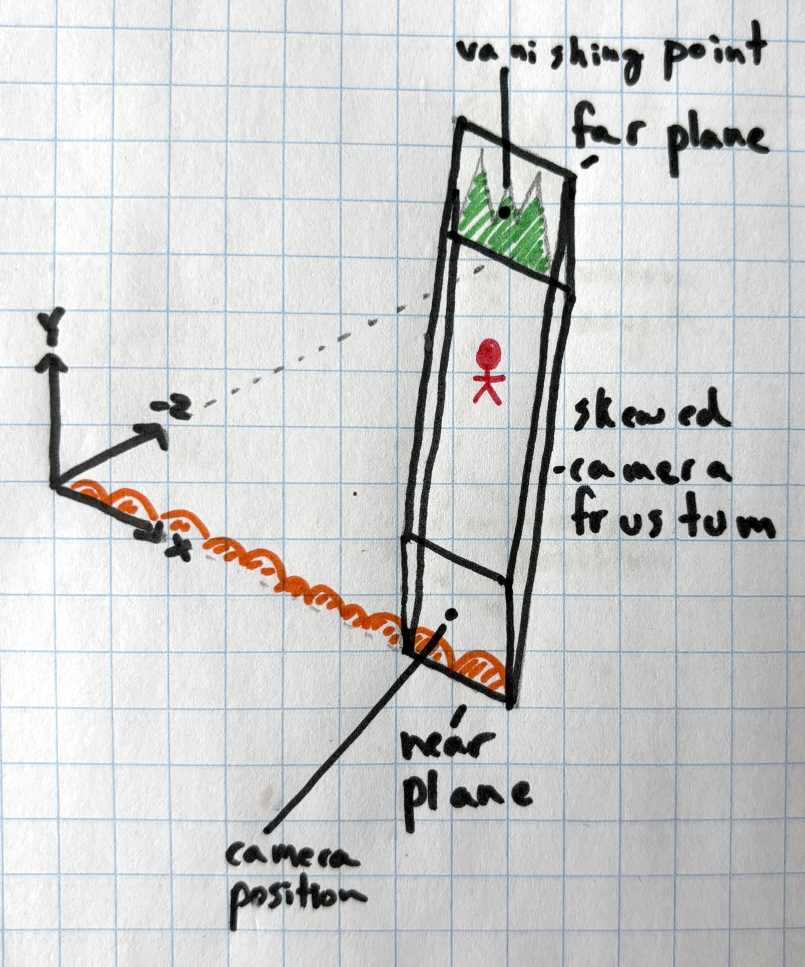
To make the shadows look good, I knew I needed to go back to using an orthographic projection with no tile scaling. But with a standard orthographic projection, there is no parallax. Objects in the background will move at the same speed as ones in the foreground. I realized I could get parallax by applying a skew transformation to the view matrix. The skew transformation would translate tiles in the x&y direction proportional to their z position in view space.
Here's how I did it:
Now as the camera moves in the xy plane, tiles at different depths will parallax with each other. Tiles placed at the vanishing point distance (on the far plane) will be stationary on-screen. Tiles close to the near-plane will move the most. Tiles halfway between the near plane and far plane will move half the distance of tiles at the near plane.
void MakeSkewedViewMat( Matrix4* skewedViewMat, const Vector3* cameraPos, float farPlaneZ )
{
    //2 matrices:
    //transform world space into view space centered at camera pos looking down -z
    //skew world in the direction of 0,0,farPlaneZ
    Matrix4 worldToCameraPos;
    {
        Matrix4 cameraPosToWorld;
        SetIdentityMatrix( &cameraPosToWorld );
        SetMatrixTranslation( &cameraPosToWorld, cameraPos );
        InvertRotTransMatrix( &worldToCameraPos, &cameraPosToWorld );
    }

    Vector3 vanishingPoint( 0.f, 0.f, farPlaneZ );
    Vector3 vanishingPointToCameraPos = *cameraPos - vanishingPoint;

    Matrix4 cameraPosToSkew;
    {
        float skewX = vanishingPointToCameraPos.x/vanishingPointToCameraPos.z;
        float skewY = vanishingPointToCameraPos.y/vanishingPointToCameraPos.z;
        SetIdentityMatrix( &cameraPosToSkew );
        cameraPosToSkew.m31 = -skewX;
        cameraPosToSkew.m32 = -skewY;
    }

    MultMatrices( skewedViewMat, &worldToCameraPos, &cameraPosToSkew );
}
Besides solving the shadowing problems, this solution had some other nice benefits:
This approach is the one I stuck with for the remainder of the project.
Something cool I realized was that a skew matrix allows you to have parallax in a single axis only. For instance, you could have a game where there is parallax when the camera moves in the x direction but not in the y direction. You'd just need to change your skew matrix construction so that the vanishing point always has the same y coordinate as the camera. This is something I'd like to experiment with in the future.
Sometimes we don't want layers to parallax with each other. For example, imagine you have a wall tile and you want to place a painting on it. You probably don't want the painting to parallax with the wall. To support this I just added a layer property to each tile. At render time, the tiles were already sorted by z depth. So I just extended the sort function to sort by z and then by layer.
Here's a video of moving the camera in the scene editor. As the camera moves you can see the scene layers translate by different amounts.
You can see the completed WebGL version of my renderer here